Deauth Attack
MDK3
is a multifunctional program, the main purpose of which is to show the weak points of WiFi networks. The mdk3 utility can use to silence WiFi, deauthenticate clients, confuse wireless network monitors, or confuse intruders who want to attack your wireless network, as well as to perform an attack aimed at lowering the encryption algorithm from WPA to a weaker one or refusing to use encryption. Those. It is clear that the program is very versatile. How to use mdk3
mdk3 <interface> <test mode> [test_ options]mdk3 does not know how to switch cards to monitor mode and does not switch the interface to the desired channel. Because of this, problems most often occur when mdk3 does not work. These are the most frequent mistakes of use – before starting the attack you need to switch to the desired channel yourself. Stop the NetworkManager so that it does not interfere with us:
sudo systemctl stop NetworkManagerPutting the wireless interface in monitor mode:
sudo ip link set wlan0 down
sudo iw wlan0 set monitor control
sudo ip link set wlan0 up
Notice that the interface name still remains wlan0 , although it is now in monitor mode.
g – WPA slide testWPA slide test is a test mode, denoted by the letter g . This mode has only one option -t
sudo airodump-ng wlan0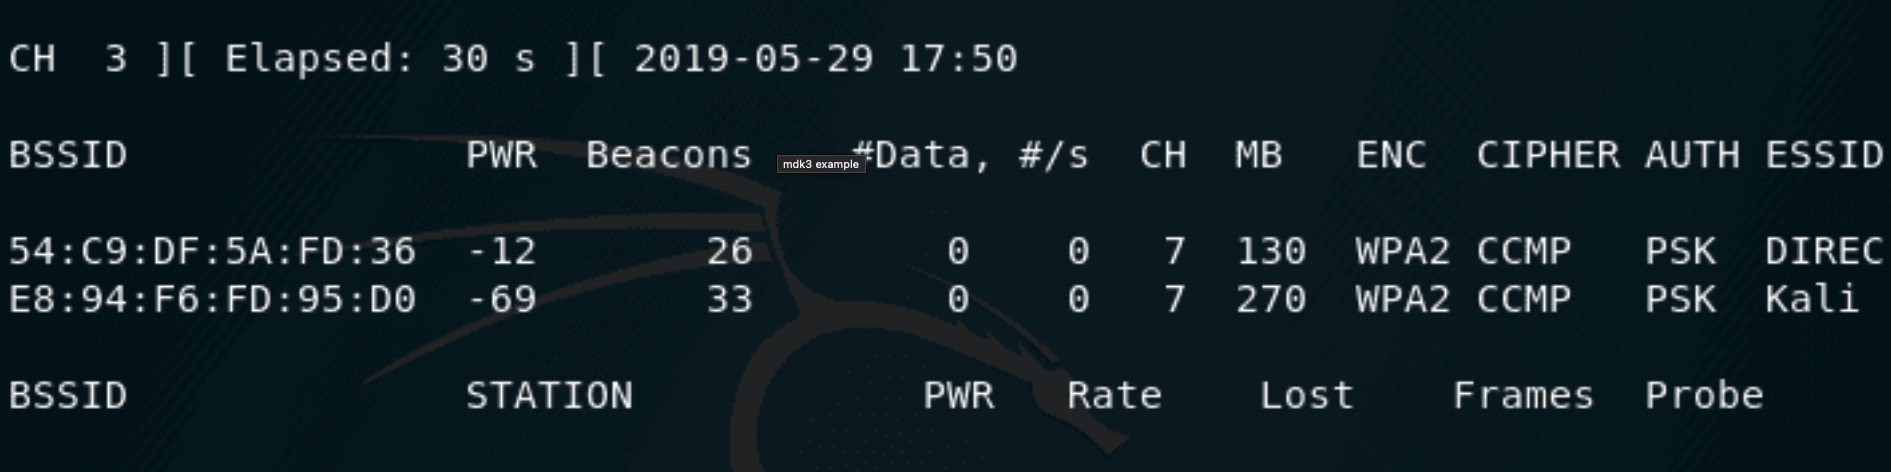 Suppose we are interested in a network named Kali, it uses WPA2 encryption and its BSSID E8:94:F6:FD:95:D0, and we also note that the AP operates on channel 7.
We need to transfer our wireless card to the same channel that the AP works:
Suppose we are interested in a network named Kali, it uses WPA2 encryption and its BSSID E8:94:F6:FD:95:D0, and we also note that the AP operates on channel 7.
We need to transfer our wireless card to the same channel that the AP works:
sudo iw wlan0 set channel 7We launch an attack that will disconnect all clients from this network and will not allow them to reconnect until the encryption is changed to WEP or is removed altogether:
sudo mdk3 wlan0 g -t E8:94:F6:FD:95:D0MDK4
This package contains a proof-of-concept tool to exploit common IEEE 802.11 protocol weaknesses. MDK4 is a new version of MDK3. MDK4 is a Wi-Fi testing tool from E7mer of 360PegasusTeam, ASPj of k2wrlz, it uses the osdep library from the aircrack-ng project to inject frames on several operating systems.
How to Perform a Deauthentication Attack. | MDK4 Tutorial.
MDK is a proof-of-concept tool to exploit common IEEE 802.11 protocol weaknesses. MDK4 is a Wi-Fi testing tool from E7mer of 360PegasusTeam, ASPj of k2wrlz, it uses the osdep library from the aircrack-ng project to inject frames on several operating systems. Features support two WiFi card (one for receiving data, another for injecting data). Supports block the specified ESSID/BSSID/Station MAC in command option. Supports both 2.4 to 5GHz (Linux). Supports IDS Evasion (Ghosting, Fragmenting, does not fully work with every driver). Supports packet fuzz testing. Procedure:
- Open terminal in Kali Linux. Type “cd mdk4”. Press Enter.
- Type “make”. Press Enter.
- Type “sudo make install”. Press Enter.
- Type “mdk4 wlan0 d -c 2”. Press Enter.
{mdk4 [Interface Name] [Attack Mode] -c [Channel Number]}
[ “-c” is used to specify the channel number]
- When you have captured the WPA Handshake or are done with it, use Ctrl+C to stop MDK4 from sending deauthentication packets. In recent years, numerous security professionals and others have acquired criminal records and ended their careers by experimenting on or actively attacking computer systems without permission. I urge you to use the information contained in this article only for lawful purposes. https://medium.com/
Deauth Attack Using Airoplay-ng
to start seeing the WiFi networks around you type down this command:
airodump-ng <network interface you want to start sniffing on>you will start seeing all the 2.4GHz networks around you it will look like this:
PWR is the “power of the network” and the distance which means how much is the network close to you physically the more the number is higher the more the network or the router is close to you.
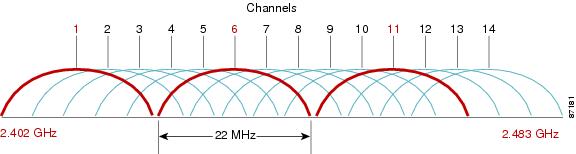
CH stands for a channel like we learned in the CCNA the non-overlapping channels in the 2.4GHz are 1, 6, 11
 to make the wireless adapter sees the 5GHz network we should change the command a bit:
airodump-ng --band <a,b,g> <network interface you want to start sniffing on>a small explanation of this in the airodump-ng man page
then you will see the 5GHz network.
now there is an option also to run airodump-ng against one specific network following this command.
airodump-ng --bssid <the MAC of the target network> --channel <the channel number the network is into> --write <the name of the file you want to store the data into> <network interface you want to start sniffing on>it will look like this:
after gathering this information let's start to attack, In the first attack we will don't need to know the password at all and it disconnects the clients from the network it goes as I call it Death attack to disconnect the client from the network we need to send a de-authentication message for the router and for the client the command to do this is: (it work with ALL the networks with ALL types of encryption)
airoplay-ng --deauth <number of authentication message> -a <the router MAC address> -c <the client MAC address> <if its 5GHz network then add -D> <finally the name of your adapter NIC>Hidden Networks in a lot of cases, we run into a hidden network and see that we cannot see the SSID to figure out the SSID of the network we are going to run airodump-ng against this specific network following the same command as we used before:
airodump-ng --bssid <the MAC of the target network> --channel <the channel number the network is into> --write <the name of the file you want to store the data into> <network interface you want to start sniffing on>what we are going to do is at the same time we are running airodump-ng on this specific network we are going to do a de-authentication attack for a short period of time so the client force reconnects to the network and we are sniffing on the same channel so when the client resend the name of the network in the air we could be able to capture it, we will use the same command for a de-authentication attack:
airoplay-ng --deauth <number of authentication message> -a <the router MAC address> -c <the client MAC address> <if its 5GHz network then add -D> <finally the name of your adapter NIC>Bypassing MAC Filtering Black and White list the way to bypass the mac filtering is to monitor the network to see which client is connected to it with the commands that we learned and we will capture the mac address of the client that is connected to the network and set it to our machine address because if the device connected successfully to the network that means it is in the white list. in the black list case we can use any random mac address to set to our machine and that also well work we can do this in the MACCHANGER tool:
macchanger -r <for random> or -m <for specific mac> <interface name>